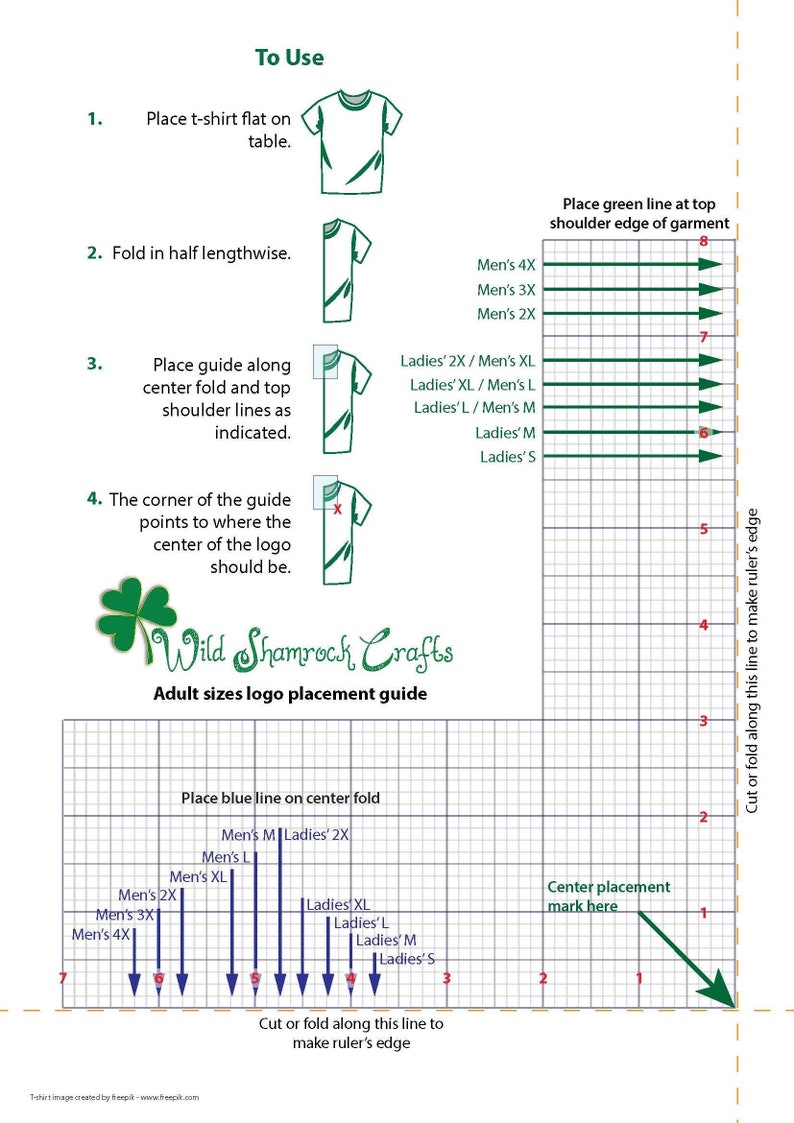
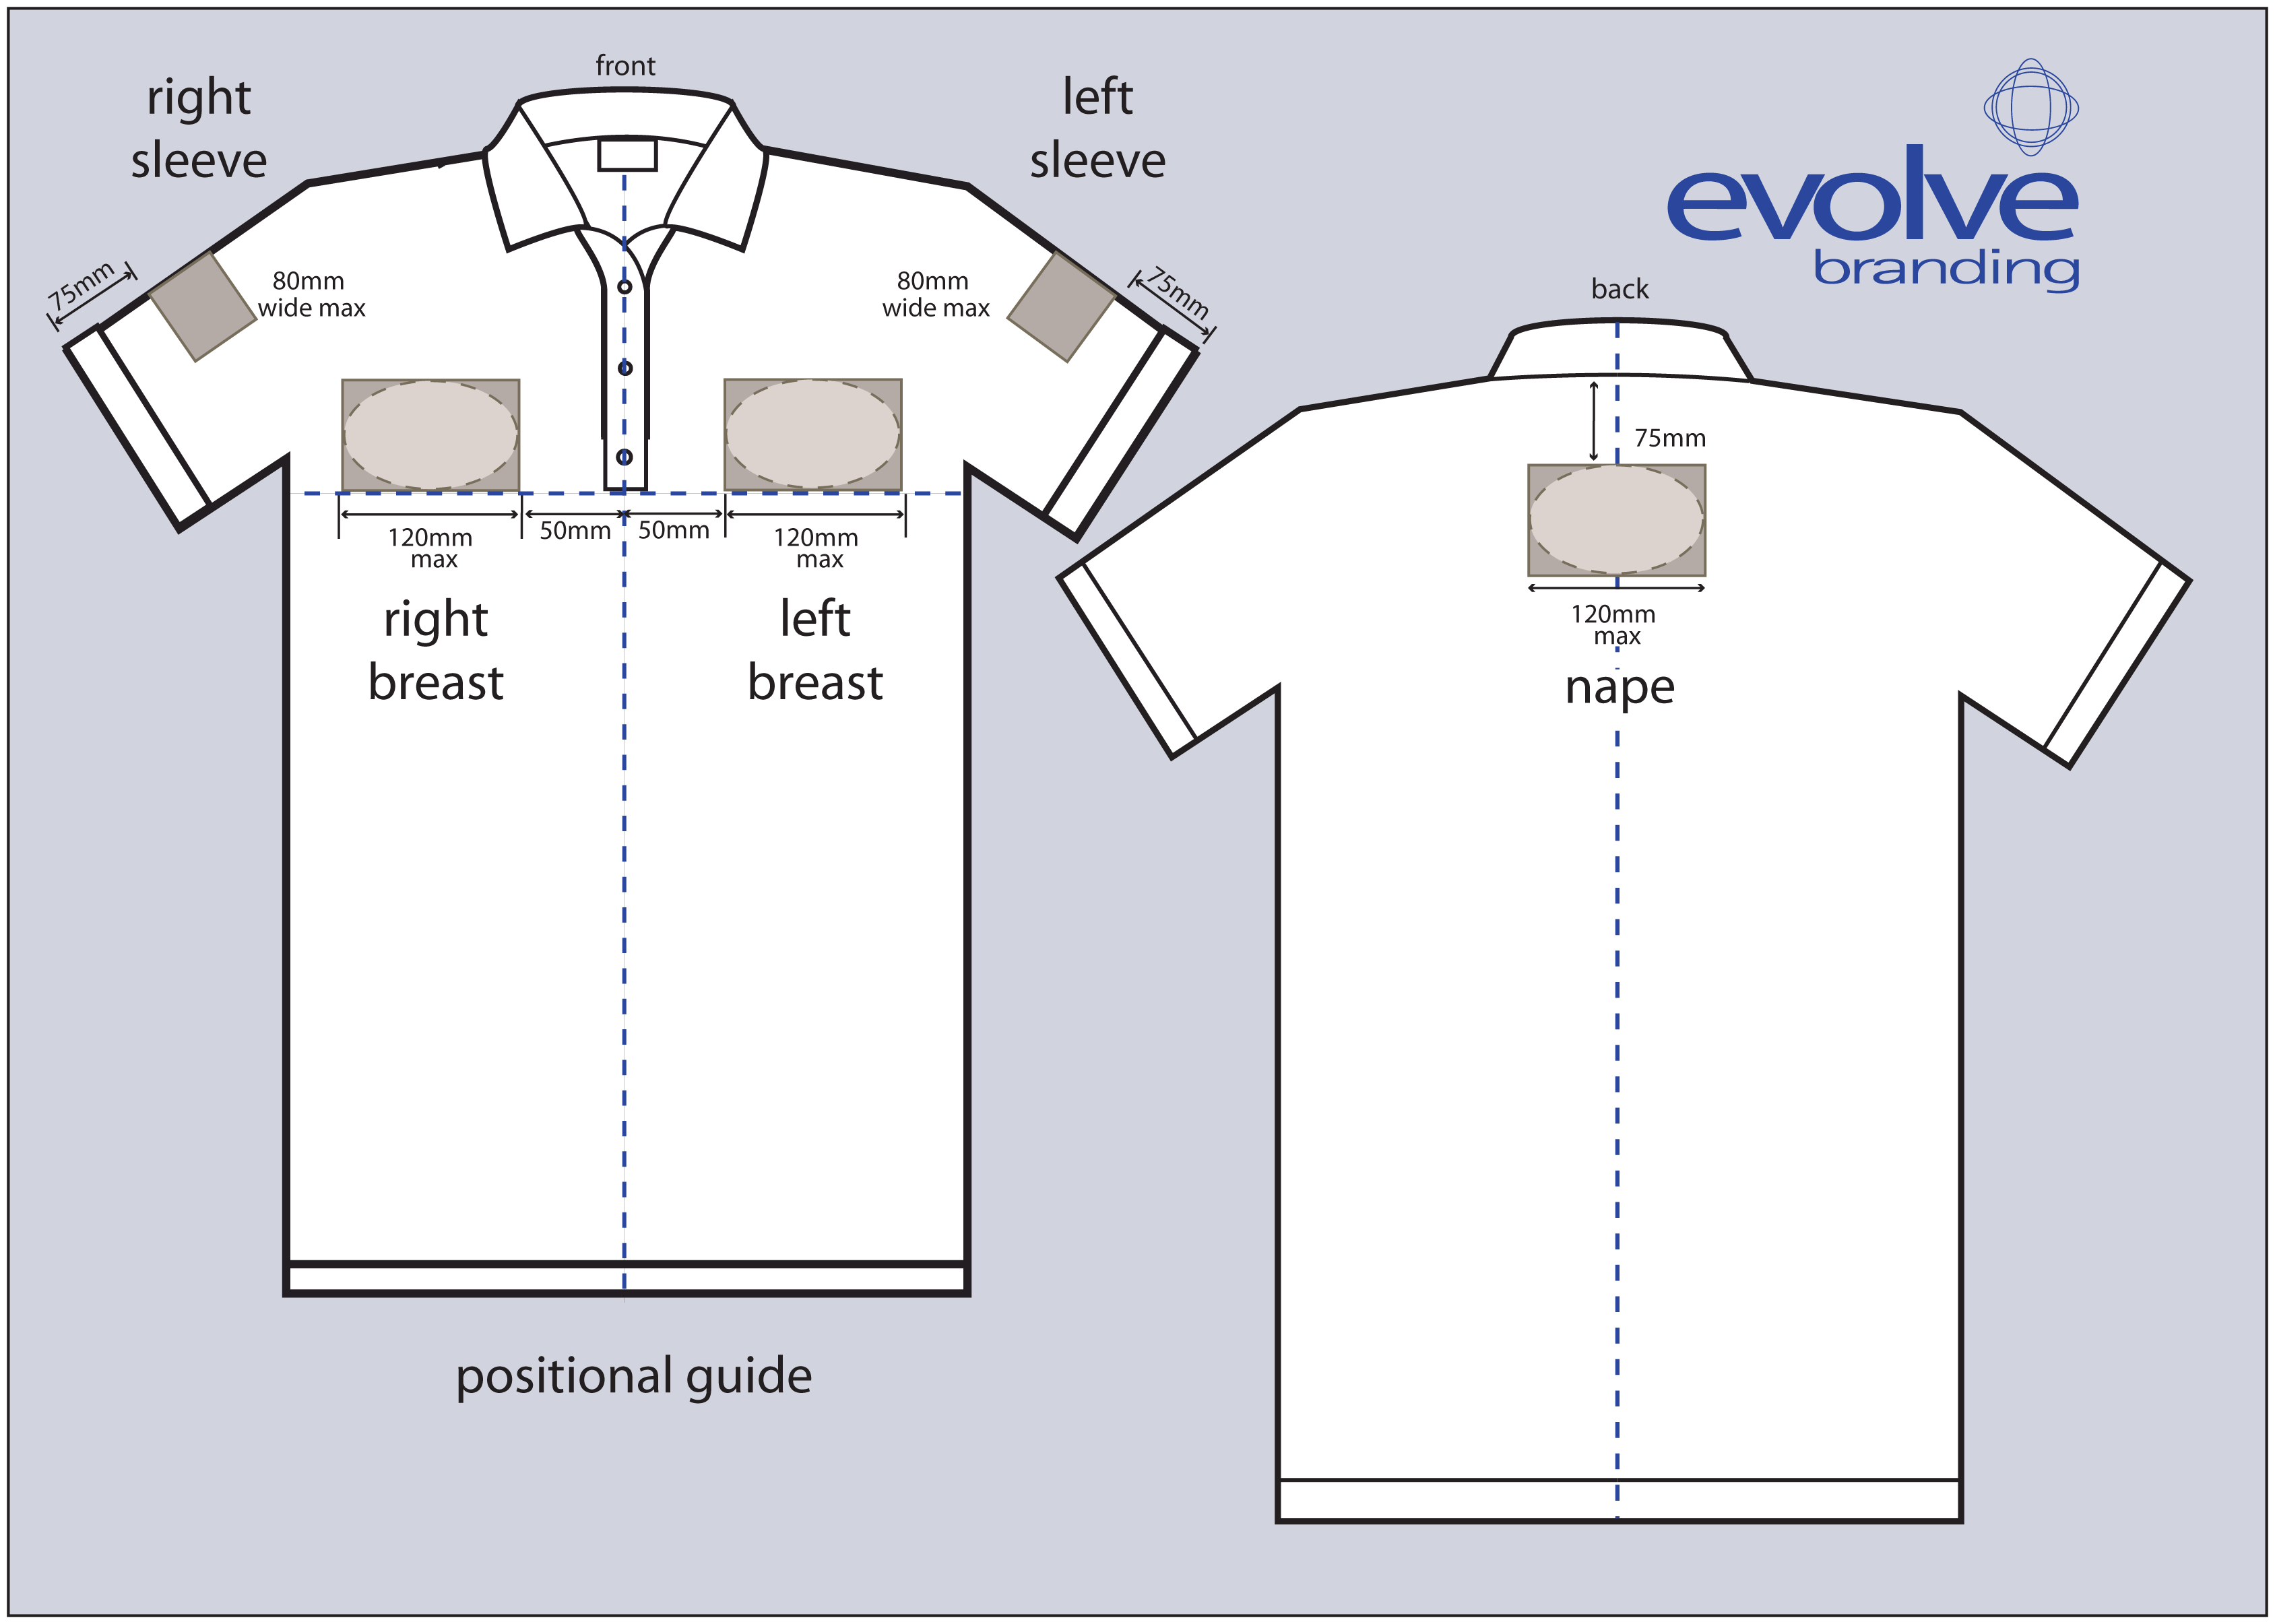
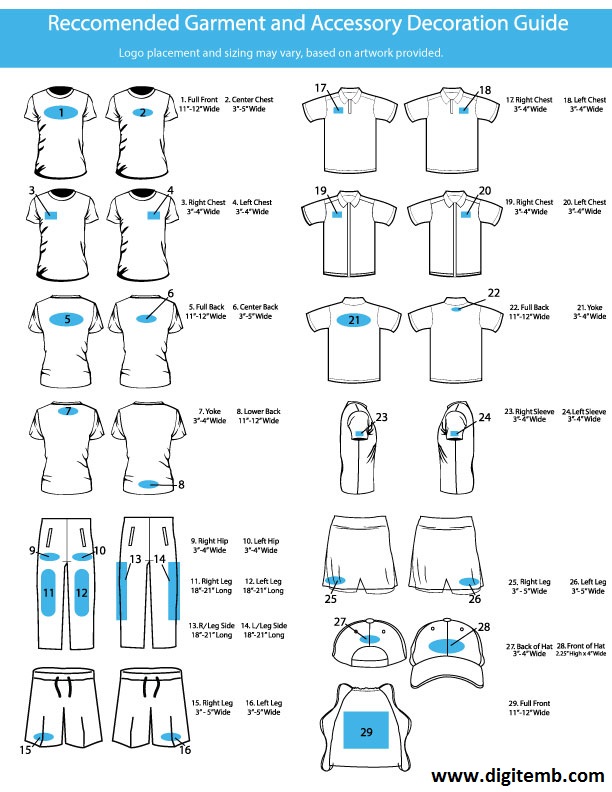
Printable Embroidery Placement Guide
Printable Embroidery Placement Guide - The center embroidery placement is best for smaller embroidery designs, like logos, text, quotes, or small artwork. Print out the design in 1:1 scale. Web this is a series of free printable embroidery stitch guides that can be collected and kept in your sewing box. This is only a guide line and should be used accordingly. Web you can print a template in any embroidery editing software. Web for embroidery, the centered placement size is 4” × 4”. Line the mark on the fabric up with the base line on the embroidery sheet. These look like crosses or t squares, some have cutouts for the neck of the shirt and are. These serve as our general placements, and can be used as a basic guide in understanding where the embroidery will be placed. If you want to embroider a bigger design on the front of the shirt, use the large center placement. These serve as our general placements, and can be used as a basic guide in understanding where the embroidery will be placed. Web how to determine the embroidery placement measurement. Of course, feel free to print them off and refer to them when needed. You’ll need to have adobe acrobat reader installed on your computer.if you don't have it, you. Mark a mark with a chalk pen at the center of the position for the pattern to be embroidered. These also work well as client intake forms so that. The sizing of the monograms used on linens is based on the size of the item that you are going to be working with. When you print the design,. Web tools. Web how to determine the embroidery placement measurement. They look great laminated and held together with a binder ring. Use get form or simply click on the template preview to open it in the editor. As garment brands and styles differ, so we will often have specific dimensions for different types of garments. Web this is an embroidery placement guide. Of course, feel free to print them off and refer to them when needed. Web this is an embroidery placement guide of all the standard print locatons and sizes. Print out the design in 1:1 scale. If you want to embroider a bigger design on the front of the shirt, use the large center placement. These also work well as. Web check out our machine embroidery for beginner’s guide. Place the inner frame with the fabric on the outer frame and stretch the fabric. When you print the design,. Web this is an embroidery placement guide of all the standard print locatons and sizes. Web this is a series of free printable embroidery stitch guides that can be collected and. Start completing the fillable fields and carefully type in required information. For finding exactly where you should place the design accurately, measure the width of the item, usually on clothes from one side seam to the other side seam or if there is a placket, from the placket to the side seam. Web embroidery placement guide click here for a. They will keep for a long time and it makes it easy to grab when you are working with linens. Line the mark on the fabric up with the base line on the embroidery sheet. If you want to embroider a bigger design on the front of the shirt, use the large center placement. Some embroidery designs include a placement. Web embroidery placement guide click here for a printable version of these project instructions. You’ll need to have adobe acrobat reader installed on your computer.if you don't have it, you can download a free copy by clicking on the icon below. If you want to embroider a bigger design on the front of the shirt, use the large center placement.. Use get form or simply click on the template preview to open it in the editor. The center embroidery placement is best for smaller embroidery designs, like logos, text, quotes, or small artwork. Use the cross or check marks in the top toolbar to select. The guide is a running stitch outline of an item, such as a collar point,. Web you can print a template in any embroidery editing software. Use the cross or check marks in the top toolbar to select. Too high or too low and they just don’t look right! You’ll need to have adobe acrobat reader installed on your computer.if you don't have it, you can download a free copy by clicking on the icon. Print out the design in 1:1 scale. Too high or too low and they just don’t look right! As garment brands and styles differ, so we will often have specific dimensions for different types of garments. Web you can print a template in any embroidery editing software. If you want to embroider a bigger design on the front of the shirt, use the large center placement. Line the mark on the fabric up with the base line on the embroidery sheet. Mark a mark with a chalk pen at the center of the position for the pattern to be embroidered. They are available on line and in printable form. The center embroidery placement is best for smaller embroidery designs, like logos, text, quotes, or small artwork. Web this is a series of free printable embroidery stitch guides that can be collected and kept in your sewing box. For finding exactly where you should place the design accurately, measure the width of the item, usually on clothes from one side seam to the other side seam or if there is a placket, from the placket to the side seam. Web check out our machine embroidery for beginner’s guide. Web these nifty “cheater” templates guide you in determining embroidery design placement based on industry standards. Start completing the fillable fields and carefully type in required information. You’ll need to have adobe acrobat reader installed on your computer.if you don't have it, you can download a free copy by clicking on the icon below. Web this is an embroidery placement guide of all the standard print locatons and sizes. Web embroidery placement guide click here for a printable version of these project instructions. Place the inner frame with the fabric on the outer frame and stretch the fabric. Use get form or simply click on the template preview to open it in the editor. The guide is a running stitch outline of an item, such as a collar point, corner of a rectangle or square, pocket top, or pant leg hem. For finding exactly where you should place the design accurately, measure the width of the item, usually on clothes from one side seam to the other side seam or if there is a placket, from the placket to the side seam. They are available on line and in printable form. Web tools for perfect embroidery placement placement charts: The guide is a running stitch outline of an item, such as a collar point, corner of a rectangle or square, pocket top, or pant leg hem. Web how to determine the embroidery placement measurement. Place the inner frame with the fabric on the outer frame and stretch the fabric. The center embroidery placement is best for smaller embroidery designs, like logos, text, quotes, or small artwork. You’ll need to have adobe acrobat reader installed on your computer.if you don't have it, you can download a free copy by clicking on the icon below. This is only a guide line and should be used accordingly. They look great laminated and held together with a binder ring. These look like crosses or t squares, some have cutouts for the neck of the shirt and are. Place the embroidery sheet on the inner frame. Mark a mark with a chalk pen at the center of the position for the pattern to be embroidered. Web for embroidery, the centered placement size is 4” × 4”. Web print out this chart and lay page 1 and 2 back to back and laminate them. Too high or too low and they just don’t look right!
embroidery logo placement Decoration Placement Charts for Shirts

Printable Embroidery Placement Guide That are Persnickety Brad Website
Printable Embroidery Placement Guide Printable Word Searches
![]()
Printable Embroidery Placement Guide Printable Word Searches

Printable Embroidery Placement Guide Printable Word Searches
placement DriverLayer Search Engine

Printable Embroidery Placement Guide Printable Word Searches
How to Prepare an Object For Embroidery Placements DigitEMB

Embroidery Placement Guide Embroidery monogram, Sewing embroidery

Embroidery Placement Guide Sewing machine embroidery, Machine
The Sizing Of The Monograms Used On Linens Is Based On The Size Of The Item That You Are Going To Be Working With.
Make Sure You Select ‘Actual Size’ Not ‘Fit To Page’ When Printing Any Of My Free Printables.
These Also Work Well As Client Intake Forms So That.
Some Embroidery Designs Include A Placement Guide As The First Color In A Design.
Related Post: